Lexus RX (RX 350L, RX450h) 2016-2025 Repair Manual: Installation
INSTALLATION
PROCEDURE
1. INSTALL NO. 2 ECM BRACKET
(a) Install the No. 2 ECM bracket to the ECM with the 2 bolts.
Torque:
3.0 N·m {31 kgf·cm, 27 in·lbf}
2. INSTALL NO. 1 ECM BRACKET
(a) Install the No. 1 ECM bracket to the ECM with the 2 bolts.
Torque:
3.0 N·m {31 kgf·cm, 27 in·lbf}
3. INSTALL ECM
(a) Install the ECM with the 2 bolts and nut.
Torque:
Bolt :
8.0 N·m {82 kgf·cm, 71 in·lbf}
Nut :
8.0 N·m {82 kgf·cm, 71 in·lbf}
NOTICE:
If the ECM has been struck or dropped, replace it.
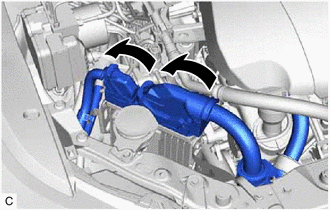
(b) Engage the wire harness clamp.
| (c) Connect the 2 ECM connectors and lower the 2 levers. NOTICE:
|
|
4. INSTALL COOL AIR INTAKE DUCT SEAL
Click here .gif)
5. CONNECT CABLE TO NEGATIVE BATTERY TERMINAL
NOTICE:
When disconnecting the cable, some systems need to be initialized after the cable is reconnected.
Click here
6. PERFORM INITIALIZATION
Click here
 Removal
REMOVAL CAUTION / NOTICE / HINT The necessary procedures (adjustment, calibration, initialization or registration) that must be performed after parts are removed and installed, or replaced during ECM ...

Other materials:
Lexus RX (RX 350L, RX450h) 2016-2025 Repair Manual > Audio And Visual System (for 8 Inch Display): Lost Communication with Haptic Device (B1323-B1326)
DESCRIPTION These DTCs are stored when communication between the radio receiver assembly and remote touch (remote operation controller assembly), combination meter assembly, headup display (meter mirror sub-assembly)* or clock assembly is not possible.
*: w/ Headup Display System
DTC No. ...
Lexus RX (RX 350L, RX450h) 2016-2025 Repair Manual > Navigation / Multi Info Display: Remote Touch
ComponentsCOMPONENTS ILLUSTRATION *1 REAR CONSOLE UPPER PANEL *2 REMOTE OPERATION CONTROLLER ASSEMBLY RemovalREMOVAL PROCEDURE 1. REMOVE REAR CONSOLE UPPER PANEL Click here 2. REMOVE REMOTE OPERATION CONTROLLER ASSEMBLY (a) Remove the 4 screws and remote operation controller assemb ...
Lexus RX (RX 350L, RX450h) 2016-{YEAR} Owners Manual
- For your information
- Pictorial index
- For safety and security
- Instrument cluster
- Operation of each component
- Driving
- Lexus Display Audio system
- Interior features
- Maintenance and care
- When trouble arises
- Vehicle specifications
- For owners
Lexus RX (RX 350L, RX450h) 2016-{YEAR} Repair Manual

0.0135