Lexus RX (RX 350L, RX450h) 2016-2025 Repair Manual: System Diagram
SYSTEM DIAGRAM
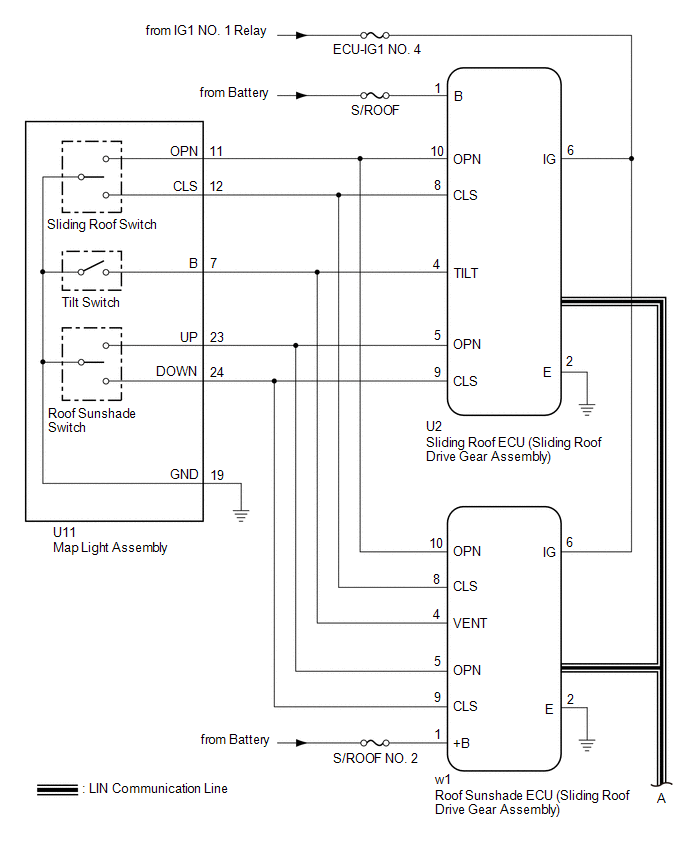
 Communication Table
 | Sender | Receiver | Signal | Line |
|---|---|---|---|
| Main Body ECU (Multiplex Network Body ECU) | Sliding Roof ECU (Sliding Roof Drive Gear Assembly) |
| LIN |
| Main Body ECU (Multiplex Network Body ECU) | Roof Sunshade ECU (Sliding Roof Drive Gear Assembly) |
| LIN |
| Sliding Roof ECU (Sliding Roof Drive Gear Assembly) | Main Body ECU (Multiplex Network Body ECU) | Sliding roof glass position signal | LIN |
| Sliding Roof ECU (Sliding Roof Drive Gear Assembly) | Roof Sunshade ECU (Sliding Roof Drive Gear Assembly) |
| LIN |
| Roof Sunshade ECU (Sliding Roof Drive Gear Assembly) | Sliding Roof ECU (Sliding Roof Drive Gear Assembly) |
| LIN |
| Combination Meter Assembly | Main Body ECU (Multiplex Network Body ECU) | Vehicle speed signal | CAN |
| Main Body ECU (Multiplex Network Body ECU) | Combination Meter Assembly | Sliding roof open warning request signal | CAN |
 Parts Location
PARTS LOCATION ILLUSTRATION *1 FRONT DOOR COURTESY LIGHT SWITCH ASSEMBLY (for LH) *2 FRONT DOOR COURTESY LIGHT SWITCH ASSEMBLY (for RH) *3 SLIDING ROOF ECU (SLIDING ROOF DRIVE GEAR ASS ...
 System Description
SYSTEM DESCRIPTION PANORAMIC MOON ROOF SYSTEM DESCRIPTION (a) The panoramic moon roof system controls the sliding roof operation using the sliding roof ECU (sliding roof drive gear assembly) and roof ...
Other materials:
Lexus RX (RX 350L, RX450h) 2016-2025 Repair Manual > Front Bumper: Installation
INSTALLATION CAUTION / NOTICE / HINT HINT: When the front bumper is damaged or deformed due to an accident or contact with other objects, etc., or the bumper installation area on the body is repaired, it is necessary to perform millimeter wave radar sensor adjustment. Click here PROCEDURE 1. INSTA ...
Lexus RX (RX 350L, RX450h) 2016-2025 Repair Manual > Vacuum Switching Valve (for Engine Mounting): Installation
INSTALLATION PROCEDURE 1. INSTALL NO. 2 VACUUM SWITCHING VALVE ASSEMBLY (a) Install the No. 2 vacuum switching valve assembly to the front engine mounting bracket with the bolt. Torque: 20 N·m {204 kgf·cm, 15 ft·lbf} (b) Connect the No. 2 vacuum switching valve assembly connector. (c) Connect th ...
Lexus RX (RX 350L, RX450h) 2016-{YEAR} Owners Manual
- For your information
- Pictorial index
- For safety and security
- Instrument cluster
- Operation of each component
- Driving
- Lexus Display Audio system
- Interior features
- Maintenance and care
- When trouble arises
- Vehicle specifications
- For owners
Lexus RX (RX 350L, RX450h) 2016-{YEAR} Repair Manual

0.0143