Lexus RX (RX 350L, RX450h) 2016-2025 Repair Manual: Disassembly
DISASSEMBLY
PROCEDURE
1. REMOVE SLIDING ROOF DRIVE GEAR SUB-ASSEMBLY
(a) Remove the bolt.
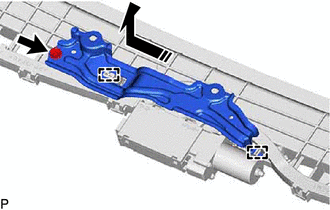
.png) | Remove in this Direction |
(b) Disengage the 2 guides as shown in the illustration to remove the map light bracket.
| (c) Remove the 2 bolts and sliding roof drive gear sub-assembly. |
|

2. REMOVE SUNSHADE TRIM SUB-ASSEMBLY
(a) Remove the screw.

| | Remove in this Direction (1) |
.png) | Remove in this Direction (2) |
(b) Disengage the guide (A) in the direction indicated by the arrow (1) shown in the illustration.
(c) Disengage the 2 guides (B) in the direction indicated by the arrow (2) shown in the illustration to remove the sliding roof piece sub-assembly LH.
HINT:
Use the same procedure for the RH side.
(d) Remove the rear sliding roof sunshade stopper as shown in the illustration.

| | Remove in this Direction |
HINT:
Use the same procedure for the RH side.
(e) Slide and remove the sunshade trim sub-assembly as shown in the illustration.

| | Remove in this Direction |
3. REMOVE SLIDING ROOF DRIVE CABLE SUB-ASSEMBLY
NOTICE:
Do not disassemble the sliding roof drive cable sub-assembly except when replacing it.
(a) Using a screwdriver, disengage the 2 claws as shown in the illustration.

| *a | Protective Tape | - | - |
| | Remove in this Direction | - | - |
HINT:
Tape the screwdriver tip before use.
(b) Slide and remove the rear roof drip channel as shown in the illustration.

| | Remove in this Direction |
(c) Hold down the roof wind deflector panel sub-assembly.

.png) | Hold Position |
(d) Using a screwdriver, slide the sliding roof drive cable LH as shown in the illustration to remove it.

| *a | Protective Tape |
| | Push Position |
| | Remove in this Direction |
HINT:
- Tape the screwdriver tip before use.
- Use the same procedure for the RH side.
 Removal
REMOVAL CAUTION / NOTICE / HINT The necessary procedures (adjustment, calibration, initialization or registration) that must be performed after parts are removed and installed, or replaced during slid ...
 Installation
INSTALLATION PROCEDURE 1. INSTALL SLIDING ROOF HOUSING ASSEMBLY (a) Loosen the 10 bolts of the brackets of the sliding roof housing assembly. (b) Temporarily install the sliding roof housing assembly ...
Other materials:
Lexus RX (RX 350L, RX450h) 2016-2025 Repair Manual > Engine Switch: Inspection
INSPECTION PROCEDURE 1. INSPECT ENGINE SWITCH (a) Measure the resistance according to the value(s) in the table below. Standard Resistance: Tester Connection Switch Condition Specified Condition 5 (SS1) - 6 (AGND) 1 (SS2) - 6 (AGND) Not pushed 10 kΩ or higher Pushed Below 1 ...
Lexus RX (RX 350L, RX450h) 2016-2025 Repair Manual > Rear No. 1 Seat Assembly (for 60/40 Split Seat Type Rh Side): Disassembly
DISASSEMBLY CAUTION / NOTICE / HINT CAUTION: Wear protective gloves. Sharp areas on the seat frame may injure your hands. PROCEDURE 1. REMOVE SEAT ADJUSTER COVER CAP (a) Remove the 2 seat adjuster cover caps. 2. REMOVE REAR SEAT COVER CAP RH (a) Using a screwdriver with its tip wrappe ...
Lexus RX (RX 350L, RX450h) 2016-{YEAR} Owners Manual
- For your information
- Pictorial index
- For safety and security
- Instrument cluster
- Operation of each component
- Driving
- Lexus Display Audio system
- Interior features
- Maintenance and care
- When trouble arises
- Vehicle specifications
- For owners
Lexus RX (RX 350L, RX450h) 2016-{YEAR} Repair Manual

0.0144