Lexus RX (RX 350L, RX450h) 2016-2025 Repair Manual: Front Right Seat Heat Sensor Circuit (B14C0)
DESCRIPTION
Output to the front seat cushion heater temperature sensor stops if one of the following occurs: 1) the temperature sensor is open or shorted; or 2) the temperature sensor is damaged and its output value does not change.
| DTC No. | Detection Item | DTC Detection Condition | Trouble Area |
|---|---|---|---|
| B14C0 | Front Right Seat Heat Sensor Circuit | Seat heater temperature sensor malfunction |
|
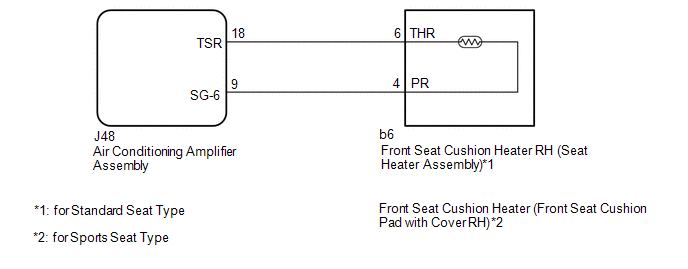
- *1: for Standard Seat Type
- *2: for Sports Seat Type
WIRING DIAGRAM
PROCEDURE
| 1. | CLEAR DTC |
(a) Clear the DTCs.
Click here .gif)
|
.gif)
| 2. | CHECK FOR DTC |
(a) Check for DTCs.
Click here
OK:
DTC B14C0 is not output.
| Result | Proceed to |
|---|---|
| OK | A |
| NG (for Standard Seat Type) | B |
| NG (for Sports Seat Type) | C |
| A | .gif) | USE SIMULATION METHOD TO CHECK |
| C | | GO TO STEP 5 |
|
| 3. | INSPECT FRONT SEAT CUSHION HEATER RH (SEAT HEATER ASSEMBLY) |
(a) Remove the front seat cushion heater RH (seat heater assembly).
Click here
(b) Inspect the front seat cushion heater RH (seat heater assembly).
Click here
| NG | | REPLACE FRONT SEAT CUSHION HEATER RH (SEAT HEATER ASSEMBLY) |
|
| 4. | CHECK HARNESS AND CONNECTOR (AIR CONDITIONING AMPLIFIER ASSEMBLY - FRONT SEAT CUSHION HEATER RH (SEAT HEATER ASSEMBLY)) |
(a) Disconnect the J48 air conditioning amplifier assembly connector.
(b) Measure the resistance according to the value(s) in the table below.
Standard Resistance:
| Tester Connection | Condition | Specified Condition |
|---|---|---|
| J48-18 (TSR) - b6-6 (THR) | Always | Below 1 Ω |
| J48-18 (TSR) or b6-6 (THR) - Body ground | Always | 10 kΩ or higher |
| J48-9 (SG-6) - b6-4 (PR) | Always | Below 1 Ω |
| J48-9 (SG-6) or b6-4 (PR) - Body ground | Always | 10 kΩ or higher |
| OK | | REPLACE AIR CONDITIONING AMPLIFIER ASSEMBLY |
| NG | | REPAIR OR REPLACE HARNESS OR CONNECTOR |
| 5. | INSPECT FRONT SEAT CUSHION HEATER (FRONT SEAT CUSHION PAD WITH COVER RH) |
(a) Remove the front seat cushion heater (front seat cushion pad with cover RH).
Click here
(b) Inspect the front seat cushion heater (front seat cushion pad with cover RH).
Click here
| NG | | REPLACE FRONT SEAT CUSHION HEATER (FRONT SEAT CUSHION PAD WITH COVER RH) |
|
| 6. | CHECK HARNESS AND CONNECTOR (AIR CONDITIONING AMPLIFIER ASSEMBLY - FRONT SEAT CUSHION HEATER (FRONT SEAT CUSHION PAD WITH COVER RH)) |
(a) Disconnect the J48 air conditioning amplifier assembly connector.
(b) Measure the resistance according to the value(s) in the table below.
Standard Resistance:
| Tester Connection | Condition | Specified Condition |
|---|---|---|
| J48-18 (TSR) - b6-6 (THR) | Always | Below 1 Ω |
| J48-18 (TSR) or b6-6 (THR) - Body ground | Always | 10 kΩ or higher |
| J48-9 (SG-6) - b6-4 (PR) | Always | Below 1 Ω |
| J48-9 (SG-6) or b6-4 (PR) - Body ground | Always | 10 kΩ or higher |
| OK | | REPLACE AIR CONDITIONING AMPLIFIER ASSEMBLY |
| NG | | REPAIR OR REPLACE HARNESS OR CONNECTOR |
 Lost Communication with Front Seat Temperature Adjustment Switch LIN (B14B5)
DESCRIPTION The refreshing seat switch (for front side) communicates with the air conditioning amplifier assembly via LIN communication. If the LIN communication system is malfunctioning, the air cond ...
 Front Left Seat Heat Sensor Circuit (B14C1)
DESCRIPTION Output to the front seat cushion heater temperature sensor stops if one of the following occurs: 1) the temperature sensor is open or shorted; or 2) the temperature sensor is damaged and i ...
Other materials:
Lexus RX (RX 350L, RX450h) 2016-2025 Repair Manual > Network Gateway Ecu: Removal
REMOVAL CAUTION / NOTICE / HINT The necessary procedures (adjustment, calibration, initialization, or registration) that must be performed after parts are removed and installed, or replaced during network gateway ECU removal/installation are shown below. Necessary Procedures After Parts Removed/Inst ...
Lexus RX (RX 350L, RX450h) 2016-2025 Repair Manual > Front Radar Sensor System: Utility
UTILITY NOTICE:
When replacing the millimeter wave radar sensor assembly, always replace it with a new one. If a millimeter wave radar sensor assembly which was installed to another vehicle is used, the information stored in the millimeter wave radar sensor assembly will not match the information ...
Lexus RX (RX 350L, RX450h) 2016-{YEAR} Owners Manual
- For your information
- Pictorial index
- For safety and security
- Instrument cluster
- Operation of each component
- Driving
- Lexus Display Audio system
- Interior features
- Maintenance and care
- When trouble arises
- Vehicle specifications
- For owners
Lexus RX (RX 350L, RX450h) 2016-{YEAR} Repair Manual

0.0152