Lexus RX (RX 350L, RX450h) 2016-2025 Repair Manual: Removal
REMOVAL
CAUTION / NOTICE / HINT
HINT:
- Use the same procedure for the RH side and LH side.
- The following procedure is for the LH side.
- If the front speed sensor rotor needs to be replaced, replace the front axle hub sub-assembly.
PROCEDURE
1. REMOVE FRONT WHEEL
Click here .gif)
2. SEPARATE FRONT FENDER SPLASH SHIELD SUB-ASSEMBLY
(a) Remove the screw and clip to separate the front fender splash shield sub-assembly.
3. REMOVE FRONT SPEED SENSOR (w/o AVS)
(a) Turn back the front fender splash shield sub-assembly.
| (b) Disconnect the front speed sensor connector. |
|
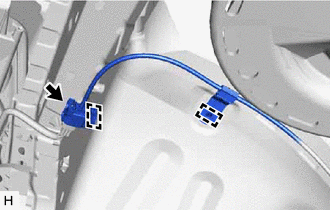
(c) Disengage the 2 sensor clamps.
| (d) Remove the bolt and sensor clamp. |
|
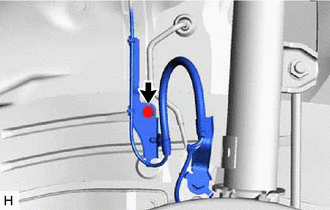
| (e) Remove the bolt and separate the front flexible hose and sensor clamp. |
|
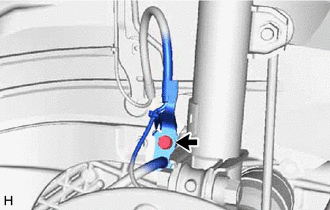
| (f) Disengage the 2 claws to separate the sensor clamp. |
|
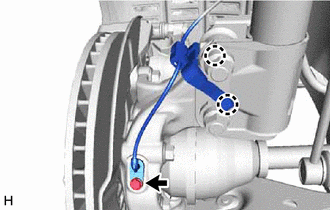
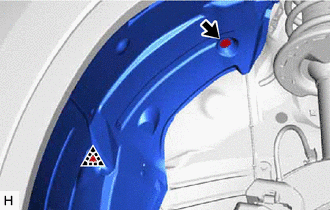
(g) Remove the bolt and front speed sensor from the steering knuckle.
NOTICE:
- Keep the tip of the front speed sensor and installation hole free of foreign matter.
- Do not rotate or apply excessive force to the front speed sensor when removing it from the steering knuckle. Rotating or applying excessive force may result in damage to the front speed sensor.
4. REMOVE FRONT SPEED SENSOR (w/ AVS)
| (a) Disconnect the front speed sensor connector. |
|
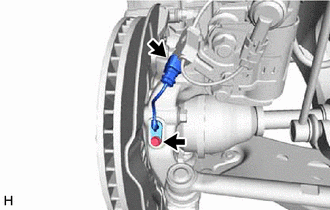
(b) Remove the bolt and front speed sensor from the steering knuckle.
NOTICE:
- Keep the tip of the front speed sensor and installation hole free of foreign matter.
- Do not rotate or apply excessive force to the front speed sensor when removing it from the steering knuckle. Rotating or applying excessive force may result in damage to the front speed sensor.
5. REMOVE FRONT SKID CONTROL SENSOR WIRE (w/ AVS)
(a) Turn back the front fender splash shield sub-assembly.
| (b) Disconnect the front skid control sensor wire connector. |
|
(c) Disengage the 2 sensor clamps.
| (d) Remove the bolt and sensor clamp. |
|
| (e) Remove the bolt and separate the front flexible hose and sensor clamp. |
|
| (f) Disconnect the connector from the front shock absorber assembly. |
|
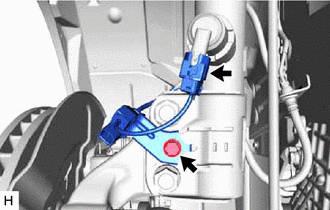
(g) Remove the bolt and front skid control sensor wire from the front shock absorber assembly.
 Installation
INSTALLATION CAUTION / NOTICE / HINT HINT:
Use the same procedure for the RH side and LH side.
The following procedure is for the LH side.
If the front speed sensor rotor needs to be replaced, ...

Other materials:
Lexus RX (RX 350L, RX450h) 2016-2025 Repair Manual > Front Camera System: Problem Symptoms Table
PROBLEM SYMPTOMS TABLE HINT:
Use the table below to help determine the cause of problem symptoms. If multiple suspected areas are listed, the potential causes of the symptoms are listed in order of probability in the "Suspected Area" column of the table. Check each symptom by checking the suspect ...
Lexus RX (RX 350L, RX450h) 2016-2025 Repair Manual > Automatic Transaxle System: Initialization
INITIALIZATION RESET TRANSAXLE COMPENSATION CODE NOTICE:
If the following parts have been replaced, initialize the ECM and perform Reset Memory and Perform Road Test to Allow ECM to Learn.
ECM
Transmission valve body assembly
Shift solenoid valve SL3
Shift solenoid valve SL4
Shift sole ...
Lexus RX (RX 350L, RX450h) 2016-{YEAR} Owners Manual
- For your information
- Pictorial index
- For safety and security
- Instrument cluster
- Operation of each component
- Driving
- Lexus Display Audio system
- Interior features
- Maintenance and care
- When trouble arises
- Vehicle specifications
- For owners
Lexus RX (RX 350L, RX450h) 2016-{YEAR} Repair Manual

0.0134