Lexus RX (RX 350L, RX450h) 2016-2025 Repair Manual: Removal
REMOVAL
CAUTION / NOTICE / HINT
HINT:
- Use the same procedure for the RH side and LH side.
- The following procedure is for the LH side.
PROCEDURE
1. REMOVE REAR NO. 2 SEAT ASSEMBLY
Click here .gif)
2. REMOVE REAR DOOR SCUFF PLATE
Click here
3. REMOVE REAR DOOR INSIDE SCUFF PLATE
Click here
4. REMOVE REAR SEAT OUTER TRACK BRACKET COVER LH (for LH Side)
for 60/40 Split Seat Type:
Click here
for Captain Seat Type:
Click here
5. REMOVE REAR SEAT OUTER TRACK BRACKET COVER RH (for RH Side)
for 60/40 Split Seat Type:
Click here
for Captain Seat Type:
HINT:
Use the same procedure as for the LH side.
Click here
6. REMOVE FRONT DECK SIDE TRIM COVER
Click here
7. REMOVE REAR SEAT SIDE GARNISH
Click here
8. REMOVE NO. 1 LUGGAGE COMPARTMENT TRIM HOOK (for LH Side)
Click here
9. REMOVE ROPE HOOK ASSEMBLY (for LH Side)
Click here
10. REMOVE NO. 1 LUGGAGE COMPARTMENT LIGHT ASSEMBLY (for LH Side)
Click here
11. REMOVE NO. 1 LUGGAGE COMPARTMENT TRIM HOOK (for RH Side)
Click here
12. REMOVE ROPE HOOK ASSEMBLY (for RH Side)
HINT:
Use the same procedure as for the LH side.
13. REMOVE NO. 1 LUGGAGE COMPARTMENT LIGHT ASSEMBLY (for RH Side)
Click here
14. REMOVE NO. 2 AIR CONDITIONING CONTROL ASSEMBLY (for LH Side)
Click here
15. REMOVE COOLER (NO. 2 ROOM TEMP. SENSOR) THERMISTOR (for LH Side)
Click here
16. REMOVE DECK TRIM SIDE PANEL ASSEMBLY LH (for LH Side)
Click here
17. REMOVE DECK TRIM SIDE PANEL ASSEMBLY RH (for RH Side)
Click here
18. DISCONNECT REAR NO. 2 SEAT OUTER BELT ASSEMBLY
Click here
19. REMOVE ROOF SIDE INNER GARNISH ASSEMBLY
Click here
20. REMOVE REAR ROOF SIDE RAIL GARNISH ASSEMBLY
Click here
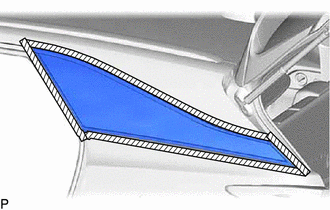
21. REMOVE QUARTER WINDOW ASSEMBLY
(a) Apply protective tape to the area around the installation position of the quarter window assembly on the vehicle body to prevent it from being scratched.
.png) | Protective Tape |
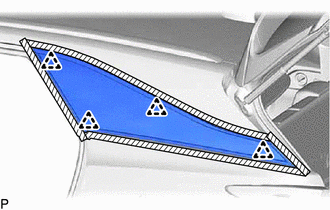
| (b) Pass a piano wire between the vehicle body and quarter window assembly from the interior. |
|
(c) Tie both wire ends to wooden blocks or similar objects that can serve as handles.
(d) Cut the adhesive by pulling the piano wire around the quarter window assembly.
NOTICE:
When separating the quarter window assembly, be careful not to damage the paint or interior and exterior ornaments.
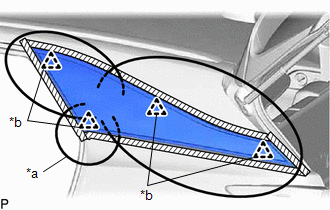
| (e) Using suction cups, disengage the 4 clips and remove the quarter window assembly. NOTICE: Be careful not to drop the quarter window assembly. |
|
22. CLEAN VEHICLE BODY
(a) Clean and shape the contact surfaces of the vehicle body.
(1) Using a knife, cut off any excess adhesive on the contact surfaces of the vehicle body as shown in the illustration.
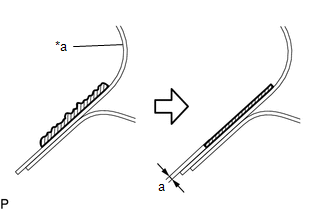
| *a | Vehicle Body |
| | Adhesive |
Standard Dimension:
| Area | Dimension |
|---|---|
| a | 1.0 mm (0.0394 in.) or more |
NOTICE:
Be careful not to damage the vehicle body.
HINT:
Leave approximately 1.0 mm (0.0394 in.) of adhesive on the vehicle body.
(b) Clean the contact surfaces of the vehicle body with a piece of cloth saturated with non-residue solvent.
HINT:
Even if all of the adhesive has been removed, clean the vehicle body.
 Components
COMPONENTS ILLUSTRATION *A for RH Side *B for LH Side *1 FRONT DECK SIDE TRIM COVER *2 REAR DOOR INSIDE SCUFF PLATE *3 REAR DOOR SCUFF PLATE *4 REAR SEAT OUTER TRACK BRAC ...
 Installation
INSTALLATION CAUTION / NOTICE / HINT HINT:
Use the same procedure for the RH side and LH side.
The following procedure is for the LH side.
PROCEDURE 1. INSTALL QUARTER WINDOW ASSEMBLY (a) Usin ...
Other materials:
Lexus RX (RX 350L, RX450h) 2016-2025 Repair Manual > Certification Ecu: Removal
REMOVAL CAUTION / NOTICE / HINT The necessary procedures (adjustment, calibration, initialization, or registration) that must be performed after parts are removed and installed, or replaced during certification ECU (smart key ECU assembly) removal/installation are shown below. Necessary Procedure Af ...
Lexus RX (RX 350L, RX450h) 2016-2025 Repair Manual > Navigation System: CD/DVD Sound Skips
CAUTION / NOTICE / HINT NOTICE: Depending on the parts that are replaced during vehicle inspection or maintenance, performing initialization, registration or calibration may be needed. Refer to Precaution for Navigation System. Click here PROCEDURE 1. CHECK DISC (a) Check that the disc ...
Lexus RX (RX 350L, RX450h) 2016-{YEAR} Owners Manual
- For your information
- Pictorial index
- For safety and security
- Instrument cluster
- Operation of each component
- Driving
- Lexus Display Audio system
- Interior features
- Maintenance and care
- When trouble arises
- Vehicle specifications
- For owners
Lexus RX (RX 350L, RX450h) 2016-{YEAR} Repair Manual

0.0161