Lexus RX (RX 350L, RX450h) 2016-2025 Repair Manual: Removal
REMOVAL
PROCEDURE
1. RECOVER REFRIGERANT FROM REFRIGERATION SYSTEM
Click here .gif)
2. REMOVE PIPING CLAMP
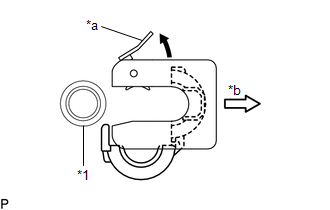
(a) for Low Pressure:
(1) While pressing the end of the suction hose sub-assembly into the end of the No. 2 air conditioner tube and accessory assembly, use pliers to squeeze together both sides of the piping clamp until it breaks apart.
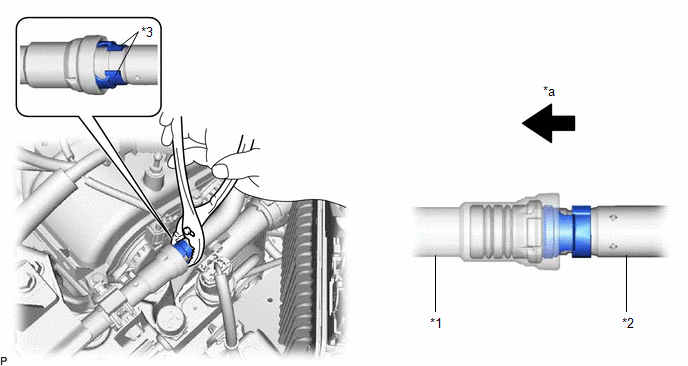
| *1 | No. 2 Air Conditioner Tube and Accessory Assembly | *2 | Suction Hose Sub-assembly |
| *3 | Piping Clamp | - | - |
| *a | Press In | - | - |
NOTICE:
- If any foreign matter is adhered to the connecting parts, brush it off or use compressed air to remove it.
- Make sure that fragments of the piping clamp do not enter the piping.
(2) Separate the suction hose sub-assembly.
NOTICE:
Clean off any foreign matter on and near the ends of the suction hose sub-assembly and No. 2 air conditioner tube and accessory assembly.
(3) Remove the 2 O-rings from the suction hose sub-assembly.
NOTICE:
Wrap the open ends of the separated No. 2 air conditioner tube and accessory assembly and suction hose sub-assembly with vinyl tape to prevent entry of moisture and foreign matter.
(4) Remove the piping clamp.
(b) for High Pressure:
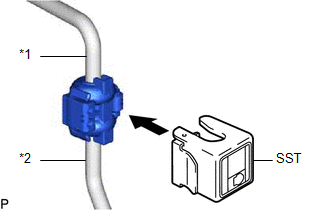
| (1) Install SST to the piping clamp as shown in the illustration. SST: 09870-00025 |
|
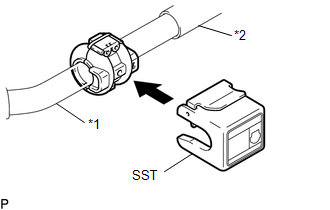
| (2) Hold the No. 2 air conditioner tube and accessory assembly and air conditioner tube and accessory assembly with each hand and push in SST with both thumbs. NOTICE: Do not apply excessive force to the No. 2 air conditioner tube and accessory assembly or air conditioner tube and accessory assembly as they may bend. |
|

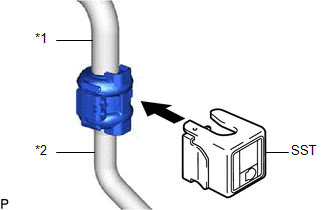
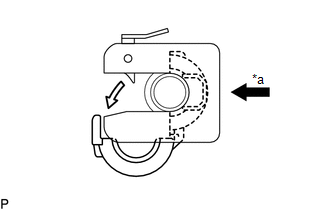
| (3) Raise the stopper of SST and remove SST and the piping clamp together from the No. 2 air conditioner tube and accessory assembly. |
|

(4) Remove the piping clamp from SST.
(5) Remove the No. 2 air conditioner tube and accessory assembly from the air conditioner tube and accessory assembly.
(6) Remove the 2 O-rings from the air conditioner tube and accessory assembly.
NOTICE:
Seal the openings of the disconnected parts using vinyl tape to prevent entry of moisture and foreign matter.
3. REMOVE PIPING CLAMP (w/ Rear Air Conditioning System)
(a) for Low Pressure:
| (1) Install SST to the piping clamp as shown in the illustration. SST: 09870-00015 |
|
| (2) Hold the No. 2 air conditioning tube and accessory assembly and air conditioning hose and accessory with each hand and push in SST with both thumbs. NOTICE: Do not apply excessive force to the No. 2 air conditioning tube and accessory assembly or air conditioning hose and accessory as they may bend. |
|
| (3) Raise the stopper of SST and remove SST and the piping clamp together from the air conditioning hose and accessory. |
|
(4) Remove the piping clamp from SST.
(5) Disconnect the No. 2 air conditioning tube and accessory assembly from the air conditioning hose and accessory.
(6) Remove the 2 O-rings from the No. 2 air conditioning tube and accessory assembly.
NOTICE:
Seal the openings of the disconnected parts using vinyl tape to prevent entry of moisture and foreign matter.
(b) for High Pressure:
| (1) Install SST to the piping clamp as shown in the illustration. SST: 09870-00025 |
|
| (2) Hold the No. 2 air conditioning tube and accessory assembly and air conditioning hose and accessory with each hand and push in SST with both thumbs. NOTICE: Do not apply excessive force to the No. 2 air conditioning tube and accessory assembly or air conditioning hose and accessory as they may bend. |
|
| (3) Raise the stopper of SST and remove SST and the piping clamp together from the air conditioning hose and accessory. |
|
(4) Remove the piping clamp from SST.
(5) Disconnect the No. 2 air conditioning tube and accessory assembly from the air conditioning hose and accessory.
(6) Remove the 2 O-rings from the No. 2 air conditioning tube and accessory assembly.
NOTICE:
Seal the openings of the disconnected parts using vinyl tape to prevent entry of moisture and foreign matter.
 Components
COMPONENTS ILLUSTRATION *A w/o Rear Air Conditioning System *B for Low Pressure *C for High Pressure - - *1 PIPING CLAMP *2 NO. 2 AIR CONDITIONER TUBE AND ACCESSORY ASSEM ...
 Installation
INSTALLATION PROCEDURE 1. INSTALL PIPING CLAMP (a) for Low Pressure: (1) Remove the vinyl tape from the open ends of the No. 2 air conditioner tube and accessory assembly and suction hose sub-assembly ...
Other materials:
Lexus RX (RX 350L, RX450h) 2016-2025 Repair Manual > Blind Spot Monitor System: Slave Module Horizontal Axis Misalignment (C1AC2)
DESCRIPTION This DTC is stored when the angle of the blind spot monitor sensor RH deviates more than the allowable range from the horizontal axis. HINT:
If a drum tester such as a speedometer tester, brake/speedometer combination tester or chassis dynamometer is used with the blind spot monitor s ...
Lexus RX (RX 350L, RX450h) 2016-2025 Repair Manual > Safety Connect System: System Description
SYSTEM DESCRIPTION DESCRIPTION (a) Safety Connect performs ACN (Automatic Collision Notification), manual emergency calling, stolen vehicle tracking and roadside assistance service by, audio and data communications between the vehicle and call center through a cellular phone network. As shown in the ...
Lexus RX (RX 350L, RX450h) 2016-{YEAR} Owners Manual
- For your information
- Pictorial index
- For safety and security
- Instrument cluster
- Operation of each component
- Driving
- Lexus Display Audio system
- Interior features
- Maintenance and care
- When trouble arises
- Vehicle specifications
- For owners
Lexus RX (RX 350L, RX450h) 2016-{YEAR} Repair Manual

0.011