Lexus RX (RX 350L, RX450h) 2016-2025 Repair Manual: Installation
INSTALLATION
CAUTION / NOTICE / HINT
CAUTION:
Wear protective gloves. Sharp areas on the seat frame may injure your hands.
PROCEDURE
1. INSTALL REAR NO. 2 SEAT ASSEMBLY
(a) Place the rear No. 2 seat assembly in the cabin.
NOTICE:
Be careful not to damage the rear No. 2 seat assembly, vehicle body or vehicle interior.
(b) Engage the 2 pins to temporarily install the rear No. 2 seat assembly.
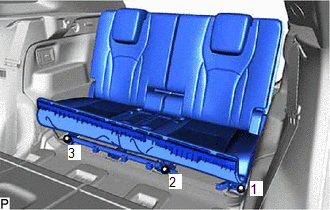
(c) Temporarily install the 3 bolts on the front side of the rear No. 2 seat assembly.
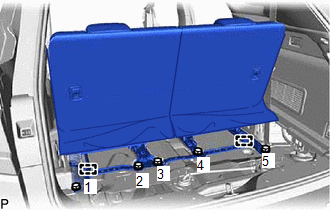
(d) Temporarily install the 5 bolts on the rear side of the rear No. 2 seat assembly.
| (e) Tighten the 5 bolts on the rear side of the rear No. 2 seat assembly. HINT: Tighten the bolts in the order shown in the illustration. Torque: 36.7 N·m {374 kgf·cm, 27 ft·lbf} |
|
| (f) Tighten the 3 bolts on the front side of the rear No. 2 seat assembly to install it. HINT: Tighten the bolts in the order shown in the illustration. Torque: 36.7 N·m {374 kgf·cm, 27 ft·lbf} |
|
(g) Engage the 6 clips.
(h) Connect the 2 connectors.
2. INSTALL FRONT DECK FLOOR BOX
Click here .gif)
3. INSTALL NO. 2 DECK FLOOR BRACKET LH (w/ Woofer)
(a) Install the No. 2 deck floor bracket LH with the 2 nuts.
4. INSTALL REAR NO. 3 SPEAKER ASSEMBLY (w/ Woofer)
Click here
5. INSTALL REAR FLOOR FINISH PLATE
Click here
6. INSTALL REAR DECK FLOOR BOX
Click here
7. CONNECT REAR NO. 2 SEAT ASSEMBLY
Click here
8. INSTALL NO. 1 DECK BOARD
Click here
9. INSTALL DECK SIDE TRIM BOX LH
Click here
10. INSTALL REAR NO. 4 FLOOR BOARD
Click here
11. INSTALL DECK BOARD ASSEMBLY
Click here
12. INSTALL TONNEAU COVER ASSEMBLY
Click here
13. PERFORM INITIALIZATION
NOTICE:
It is necessary to perform Initialization (initial position memorization) in the following situations.
- The fold seat control ECU has been replaced with a new one.
- Initialization Cancel (Initial Position Reset) has been performed.
- The cable was disconnected from the negative (-) battery terminal when a rear power seat was being operated.
Click here
 Inspection
INSPECTION PROCEDURE 1. INSPECT NO. 2 SEAT CUSHION FRAME SUB-ASSEMBLY RH *a Component without harness connected (No. 2 Seat Cushion Frame Sub-assembly RH) (a) Apply battery voltage to the lif ...
 Disassembly
DISASSEMBLY CAUTION / NOTICE / HINT CAUTION: Wear protective gloves. Sharp areas on the seat frame may injure your hands. PROCEDURE 1. REMOVE SEAT ADJUSTER COVER CAP (a) Remove the 2 seat adjuster ...
Other materials:
Lexus RX (RX 350L, RX450h) 2016-2025 Repair Manual > Brake Booster: Removal
REMOVAL CAUTION / NOTICE / HINT The necessary procedures (adjustment, calibration, initialization, or registration) that must be performed after parts are removed, installed, or replaced during brake booster assembly removal/installation are shown below. Necessary Procedure After Parts Removed/Insta ...
Lexus RX (RX 350L, RX450h) 2016-2025 Repair Manual > Occupant Classification System: Initialization
INITIALIZATION DESCRIPTION (a) Zero point of the occupant classification sensors may deviate in the following situations. To ensure sensor accuracy, be sure to perform Zero Point Calibration.
The occupant detection ECU is replaced. HINT: As the zero point is not automatically stored in a new occu ...
Lexus RX (RX 350L, RX450h) 2016-{YEAR} Owners Manual
- For your information
- Pictorial index
- For safety and security
- Instrument cluster
- Operation of each component
- Driving
- Lexus Display Audio system
- Interior features
- Maintenance and care
- When trouble arises
- Vehicle specifications
- For owners
Lexus RX (RX 350L, RX450h) 2016-{YEAR} Repair Manual

0.0108